
Ever stared at a battery and a solar panel, wondering if they’re a perfect match—or if you’ll end up with a dead battery and wasted money? Maybe you’ve bought a panel that looked powerful online, only to find your battery never quite charges up.
Or maybe you’re just tired of reading confusing guides full of math and jargon. If you want a clear, friendly explanation of how to size your solar panel for charging batteries—without the headache—you’re in the right place.
Let’s be honest: most people just want their solar system to work. You don’t want to overspend, damage your battery, or end up with a system that fails right when you need it. So, how do you figure out the right solar panel size for charging your battery? The answer is simpler than you think—and you don’t need to be an engineer.
Short Answer: Quick Solar Panel Sizing
You can size your solar panel for a battery in three steps:
- Find your battery’s capacity in amp-hours (Ah) and voltage (V).
- Estimate how much energy you want to put back into the battery each day (usually 50–80% of its total).
- Divide the needed watt-hours by the number of sunlight hours you get, then add 25–30% extra to cover losses.
For example, to charge a 12V, 100Ah battery from 50% to full in one sunny day:
- Energy needed: 12V × 50Ah = 600 watt-hours
- Sunlight hours: 5 hours (average for many places)
- Minimum panel size: 600 ÷ 5 = 120W
- Add 25% for losses: 120 × 1.25 = 150W
So, you need at least a 150W solar panel.
Of course, there’s more to the story—like types of batteries, panel efficiency, and real-world conditions. Let’s break it all down in plain English, so you never have to guess again.
Understanding The Basics: Why Sizing Matters
Choosing the right solar panel isn’t just about numbers. It’s about making sure your battery lasts, your devices work, and your investment pays off. If your panel is too small, your battery won’t charge fully. Too big, and you’ve wasted money—or could even damage some batteries.
Common mistakes include:
- Ignoring cloudy days (not every day is perfect sun)
- Forgetting losses (wires, charge controllers, panel age)
- Not matching panel voltage to battery voltage
The goal is to size your system for your real needs, not just the best-case scenario.
Step 1: Know Your Battery
Before you touch a calculator, know your battery’s details. Most batteries have a sticker showing:
- Voltage (V): Commonly 12V, 24V, or 48V
- Capacity (Ah): Example: 50Ah, 100Ah, etc.
- Type: Lead-acid, lithium-ion, AGM, etc.
Example
You have a 12V, 100Ah deep-cycle battery. This means, fully charged, it stores:
12v × 100ah = 1200 Watt-hours (wh)
But you should never drain most batteries to zero. For lead-acid, use only 50%. For lithium, you can use up to 80–90%.
Practical Tip
Check your battery’s spec sheet for maximum recommended depth of discharge (DoD). For example:
- Lead-acid: Safe to use up to 50% (so only 600Wh from a 1200Wh battery)
- Lithium: Can use 80–90% (so 960–1080Wh from a 1200Wh battery)
Using more than this shortens battery life.
Step 2: Calculate Daily Charging Needs
Ask yourself: How much of the battery do you want to recharge each day?
- If you use the battery daily, you’ll often recharge 50–80%.
- If it’s for backup (like emergencies), you might want to recharge it fully after a power cut.
Example Calculation
Let’s say you use 600Wh (half of a 12V, 100Ah battery) each day. That’s what you need to put back in.
But there’s a catch: Solar charging isn’t 100% efficient. Some energy is lost in wires, charge controllers, and the battery itself.
Rule of thumb: Add 25–30% extra to your charging needs to cover these losses.
600wh × 1.25 = 750wh Needed From Your Panel
Quick Reference Table
Here’s how much energy you need from your solar panel to recharge different batteries:
| Battery Size (Ah) | Voltage (V) | Usable Capacity (Wh) | Solar Energy Needed (Wh, with 25% losses) |
|---|---|---|---|
| 50 | 12 | 300 | 375 |
| 100 | 12 | 600 | 750 |
| 200 | 12 | 1200 | 1500 |
| 100 | 24 | 1200 | 1500 |
*Usable capacity assumes 50% DoD for lead-acid batteries. *
Step 3: Find Your Sunlight Hours
Not every location gets the same sunlight. The term “peak sun hours” means hours when sunlight is strong enough to give the panel its rated power.
- Northern US, Canada, UK: 3–4 hours per day
- Southern US, Australia, Africa: 5–6 hours per day
- Cloudy/rainy regions: Sometimes less than 3 hours
You can check your location’s average with a site like NREL’s Solar Maps.
Example
If you need 750Wh from your panel and get 5 peak sun hours:
Panel Size = 750wh ÷ 5h = 150w
If you get only 3 sun hours, you’ll need 750Wh ÷ 3h = 250W
Non-obvious insight: People often use the “panel’s maximum wattage” but forget most days are not perfect. Always use the average sun hours for your worst season (usually winter) if you need reliable power.
Step 4: The Solar Panel Sizing Formula
Now, let’s put it all together in one simple formula:
Solar Panel Size (W) = (Battery Ah × Battery V × % Used × 1.25) ÷ Peak Sun Hours
- Battery Ah: Battery capacity in amp-hours
- Battery V: Voltage
- % Used: Percentage you want to recharge (0.5 for 50%, 0.8 for 80%, etc.)
- 1.25: Add 25% for losses
- Peak Sun Hours: Number of average sunlight hours per day
Example
You want to recharge 80% of a 12V, 100Ah lithium battery in one day. Your area gets 5 sun hours.
Solar Panel Size = (100 × 12 × 0.8 × 1.25) ÷ 5 = (100 × 12 = 1200 × 0.8 = 960 × 1.25 = 1200) ÷ 5 = 240W
So, a 240W panel will recharge your battery in 5 sun hours.
Step 5: Consider Efficiency Losses
No system is perfect. Here’s where energy gets lost:
- Wires: Thin or long wires lose more power
- Charge controllers: PWM controllers waste more than MPPT
- Panel angle: Flat panels collect less sun
- Dirt and age: Dirty or old panels are less efficient
Practical tip: Use slightly thicker wires than you think you need, and clean your panels every few months.
Solar Charge Controller Losses
- PWM controllers: About 75–80% efficient
- MPPT controllers: About 92–98% efficient
Non-obvious insight: Upgrading to an MPPT controller can save you 10–20% in wasted energy—sometimes more than buying a bigger panel.
Real-world Example
Suppose you have a 200W panel but use a PWM controller. You’ll likely get only 160W to the battery. With an MPPT, you might get 190W. That’s a big difference over time!
Step 6: Match Panel Voltage To Battery Voltage
Your panel voltage must match or slightly exceed your battery voltage for proper charging.
- 12V battery: Use a panel with 16–18V output (standard 12V panel)
- 24V battery: Use a 24V panel, or two 12V panels in series
If the panel voltage is too low, the battery won’t charge fully.
Panel And Battery Voltage Comparison
| Battery Voltage | Panel Voltage Needed | Panel Setup |
|---|---|---|
| 12V | 16–18V | One 12V panel |
| 24V | 32–36V | Two 12V panels (series) or one 24V panel |
| 48V | 60–72V | Four 12V panels (series) or one 48V panel |
Pro tip: If you use an MPPT controller, you have more flexibility in panel voltage selection.

Credit: www.youtube.com
Step 7: Factor In Your Location And Weather
Weather isn’t the same everywhere. If you live in a place with lots of clouds, snow, or dust, expect less energy. Always size for the worst month, not the best.
If you size for summer, you might run out of power in winter.
Example
You live in Seattle (lots of clouds, 3 sun hours in winter) and want to charge a 12V, 100Ah battery from 50% in one day.
Panel size = (100 × 12 × 0.5 × 1.25) ÷ 3 = (100 × 12 = 1200 × 0.5 = 600 × 1.25 = 750) ÷ 3 = 250W
In Arizona (6 sun hours), you’d only need 750 ÷ 6 = 125W.
Step 8: Check Panel Ratings And Real-world Output
Solar panels are rated for “ideal lab conditions. ” Real output is usually 70–80% of this on a typical day.
- A 200W panel may only give you 140–160W in real use.
Tip: When in doubt, round up to the next panel size.
Panel Output Example
| Panel Rated Power (W) | Typical Real Output (W) | Good for Charging (Battery Size, 50% DoD, 5 Sun Hours) |
|---|---|---|
| 100 | 70–80 | 12V, 30–40Ah |
| 200 | 140–160 | 12V, 80–100Ah |
| 300 | 210–240 | 12V, 120–150Ah |
Sizing For Different Battery Types
Not all batteries are the same. Here’s what you need to know:
Lead-acid Batteries
- Only use 50% of their capacity to avoid damage
- Need slow, gentle charging (no huge panels)
- Cheap, heavy, common for RVs and backup
Lithium-ion Batteries
- Can use 80–90% of capacity
- Can handle fast charging (larger panels okay)
- More expensive, lighter, longer life
Non-obvious tip: If using lithium, you can safely use a bigger panel and charge faster—but make sure your charge controller supports lithium settings.
Off-grid Vs. Grid-tied Sizing
Off-grid systems (like RVs, cabins, boats) need enough solar to cover your full daily use—even on cloudy days.
Grid-tied systems (like home solar) can use the grid as backup, so sizing is less strict. For battery backup in these systems, size your panel to recharge your batteries in one day or less.
Credit: batteryfinds.com
Common Mistakes And How To Avoid Them
- Ignoring energy losses: Always add 25–30% extra panel power
- Sizing for perfect days: Use your worst-case sun hours, not the best
- Undersizing wires: Thin wires lose energy as heat
- Wrong panel voltage: Match panel voltage to battery and controller
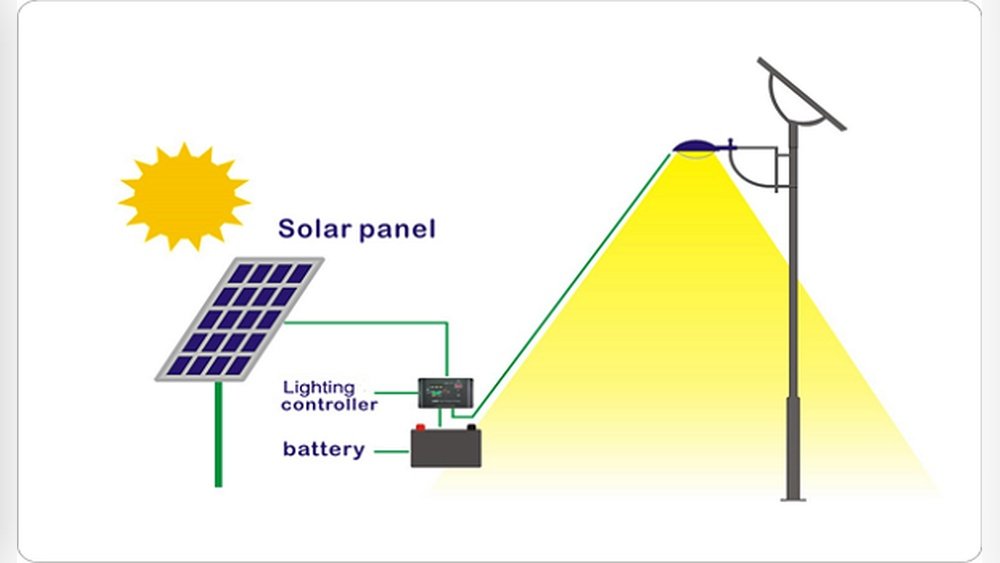
- Skipping the charge controller: Never connect a panel directly to a battery
Pro insight: If you add more batteries later, you’ll need more solar panels to keep up.
Real-world Scenarios
Scenario 1: Small Cabin Lighting
- Battery: 12V, 100Ah AGM
- Usage: LED lights, phone charging, 400Wh/day
- Sun hours: 4
Needed panel: 400Wh × 1.25 = 500Wh ÷ 4 = 125W panel
Scenario 2: Rv With Fridge
- Battery: 12V, 200Ah lithium
- Usage: Fridge, lights, fans, 1200Wh/day
- Sun hours: 5
Needed panel: 1200Wh × 1.25 = 1500Wh ÷ 5 = 300W panel
Scenario 3: Emergency Backup
- Battery: 24V, 100Ah lead-acid
- Usage: Power outage, want to recharge full battery in 2 days
- Sun hours: 3
Usable Capacity: 24v × 100ah × 0.5 = 1200wh
Needed Per Day: 600wh × 1.25 = 750wh
Panel Size: 750 ÷ 3 = 250w Panel
Credit: shopsolarkits.com
How To Choose Panels And Controllers
When shopping for panels:
- Check warranty: Good panels last 20+ years
- Look for certifications: UL, IEC, etc.
- Pick a trusted brand: Avoid cheap, unbranded panels
For controllers:
- MPPT is better for larger or higher-voltage systems
- PWM is okay for small setups
Pro tip: Always buy a charge controller rated for your battery voltage and panel current.
Expandability: Planning For The Future
If you might add more batteries, appliances, or panels later, size your wiring and controller for the future.
- Oversize your charge controller (get a 30A if you only need 20A now)
- Install heavier wires—upgrading later is a pain
Solar Panel Sizing Myths (and What Actually Matters)
- “Bigger is always better.” Not true—oversized panels can damage batteries if not controlled properly.
- “Panels always give their rated power.” Rarely—weather and angle matter a lot.
- “You don’t need a controller.” Dangerous—batteries can overcharge and fail.
What actually matters: Good math, real sun hours, quality components, and allowing for losses.
Frequently Asked Questions
How Do I Calculate Solar Panel Size For My Battery If I Use Power At Night?
Charge your battery during the day so it’s full at night. Figure out how much power you use overnight, then use the sizing formula above to match your panel to the needed energy.
Can I Use A Solar Panel Bigger Than My Battery Needs?
Yes, but you must have a good charge controller. Too much solar can overcharge and damage some batteries, especially lead-acid. MPPT controllers help manage extra power safely.
How Many Solar Panels Do I Need To Charge A 12v, 100ah Battery?
If you use 50% of the battery (600Wh), need to recharge in one day, and get 5 sun hours: Panel size = 600 × 1.25 ÷ 5 = 150W. So, one 150W panel, or two 75W panels.
What Happens If My Solar Panel Is Too Small?
Your battery won’t fully charge, which means it won’t last as long or provide as much power. Over time, undercharging can damage some battery types.
Do I Need A Special Solar Panel For Battery Charging?
No, but the panel voltage must match the battery and controller. “12V panels” are designed to work with 12V batteries and charge controllers.
When you size your solar panel with care—thinking about your battery type, your real energy needs, your weather, and a bit of extra margin for losses—you’ll enjoy reliable power and a longer-lasting battery. No more guessing, no more frustration—just a system that works. If you want to dive deeper into solar energy basics, check out the US Department of Energy’s Solar Office for official guidance and tools.
Solar power is empowering when you get it right. Now, you have everything you need to size your solar panel for battery charging—confidently and correctly.