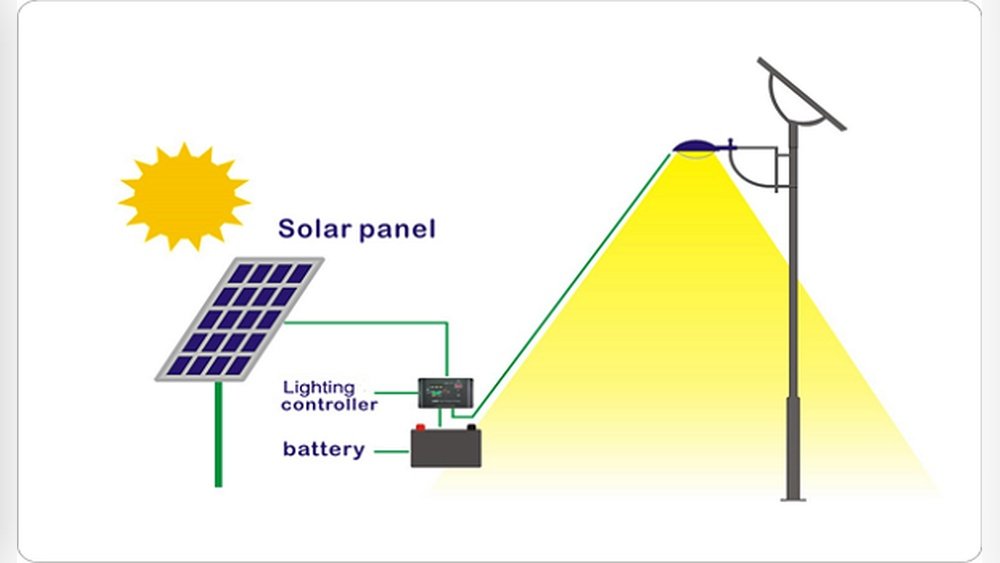

Have you ever stood on your rooftop, looking at your solar panels, and wondered, “Which wire is positive and which is negative?” Or maybe you tried connecting a solar panel to a battery and felt a bit lost. You’re not alone. Many people—homeowners, DIY fans, even some installers—get confused by the positive and negative sides of a solar panel. Mixing them up can cause problems, from weak charging to damaging your electronics.
If you want your solar system to work safely and give you the most power, you need to know how to spot the positive and negative terminals. Let’s clear up this confusion together, step by step.
Short Answer: Which Is Positive And Negative On A Solar Panel?
Every solar panel has two terminals:
- Positive (+): Usually marked with a red wire or a “+” symbol.
- Negative (–): Usually marked with a black wire or a “–” symbol.
The positive terminal sends power out, while the negative terminal completes the circuit. If you reverse them, your devices will not work, and you could even damage your battery or inverter.
Why Polarity Matters In Solar Panels
Getting the polarity right is not just a technical detail. It protects your equipment, your safety, and your energy investment.
- Safety: Wrong connections can cause sparks, overheating, or even fires.
- Efficiency: Proper polarity ensures your system charges batteries and runs devices as designed.
- Longevity: Correct wiring reduces stress on your solar components.
For example, connecting a solar panel’s positive terminal to a battery’s negative terminal will cause charging to fail. In some cases, it can permanently damage your battery.
Credit: community.goodsam.com
How To Identify Positive And Negative Terminals
Most solar panels make it clear, but some leave you guessing. Here’s how to tell:
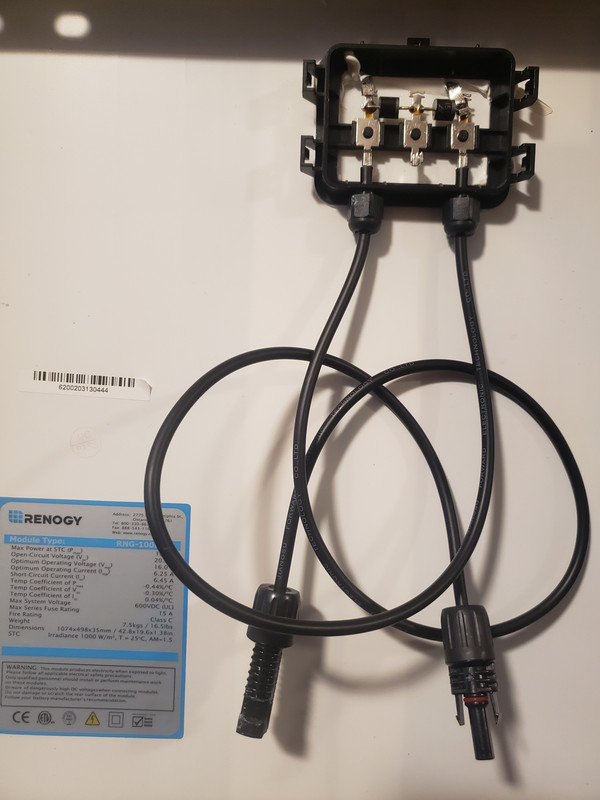
- Look for Symbols: Check the junction box or cable ends. You’ll often see a “+” (positive) and “–” (negative).
- Color Coding: Red wires are nearly always positive. Black (or sometimes blue) wires are negative.
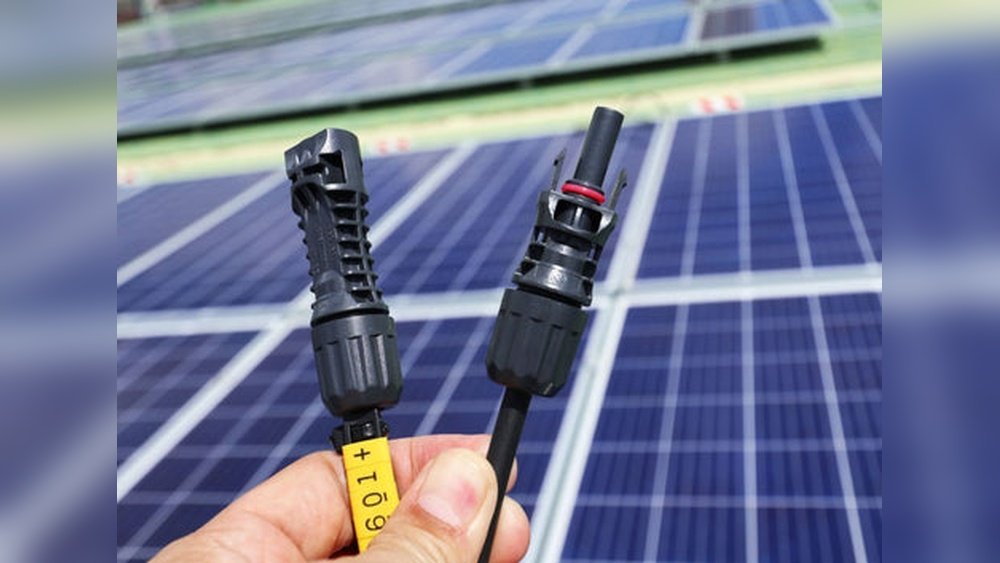
- MC4 Connectors: Most modern panels use MC4 connectors. The male MC4 is usually negative, the female is positive.
- Multimeter Test: If the markings are unclear, use a multimeter. Set it to DC volts, touch the probes to the panel leads in sunlight:
- If the screen shows a positive number, the red probe is on positive.
- If it shows a negative number, they are reversed.
Example
Suppose you have a small 12V solar panel with two wires, one red and one black. Connect your multimeter’s red probe to the red wire and black probe to the black wire. If the display shows “+18V” in sunlight, the red is positive.
Common Mistakes With Solar Panel Polarity
Many beginners make these errors:
- Mixing up red and black wires in poor lighting.
- Ignoring faded or missing labels.
- Trusting wire color when the manufacturer used different colors.
- Forgetting to check with a multimeter.
Tip: Always double-check with a meter if you’re unsure. It takes seconds and can save you from headaches.
What Happens If You Reverse Polarity?
Connecting the wrong way can cause several problems:
- No Power Output: The device or battery may not charge.
- Damage to Electronics: Sensitive devices like charge controllers or inverters can be harmed.
- Sparks or Short Circuits: In some cases, this can be dangerous.
Some modern charge controllers have reverse-polarity protection, but it’s better not to risk it.
How Solar Panels Connect To Other Devices
Solar panels rarely work alone. You connect them to batteries, charge controllers, or inverters.
- Solar Panel → Charge Controller → Battery: Always match positive to positive, negative to negative.
- Solar Panel → Direct-Connect Device: Some gadgets, like solar lights, have built-in protection, but correct polarity is still best.
Here’s a simple connection flow:
- Panel Positive (+) → Controller Positive (+)
- Panel Negative (–) → Controller Negative (–)
- Controller Positive (+) → Battery Positive (+)
- Controller Negative (–) → Battery Negative (–)
Mixing up these connections can stop your system from working.
Polarity In Series And Parallel Connections
If you want to connect multiple panels, you have two main options: series and parallel.
Series Connections
- Connect the negative of one panel to the positive of the next.
- Increases voltage, current stays the same.
Parallel Connections
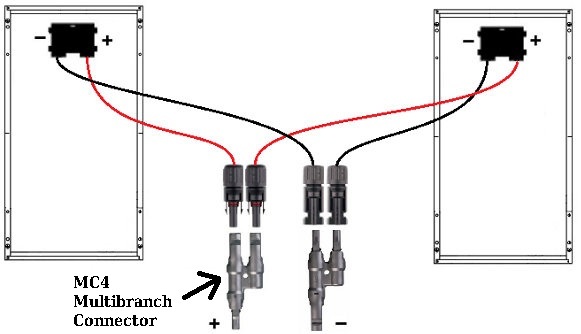
- Connect all positives together, all negatives together.
- Increases current, voltage stays the same.
Here’s a visual guide:
| Connection Type | How to Wire | Result |
|---|---|---|
| Series | Panel 1 (+) → Panel 2 (–) | Voltage adds up |
| Parallel | All (+) together, all (–) together | Current adds up |
Getting the polarity wrong here can cause current to flow backward or even damage panels.
Practical Tips For Avoiding Polarity Mistakes
- Label Wires: Use permanent markers or colored tape.
- Work in Good Light: It’s easy to mix up wires in dim conditions.
- Use Connector Clips: MC4 connectors are keyed, so they only fit one way.
- Test Before Final Connection: Use a multimeter every time.
Real-world Example: Small Off-grid System
Let’s say you have a cabin with:
- Two 100W solar panels
- 12V battery
- 20A charge controller
You want to connect for more power. You choose parallel wiring.
- Identify positive and negative on each panel (red and black wires).
- Connect both panel positives to a single positive wire, both negatives to a single negative wire.
- Run those combined wires into the charge controller, matching “+” and “–”.
- From the controller, connect to the battery, matching “+” and “–”.
If you mix up one connection, your battery won’t charge—or worse, your controller could break.
How To Check Polarity With A Multimeter: Step-by-step
- Set the multimeter to DC voltage (V with a straight line).
- Place the panel in sunlight.
- Touch the red probe to one wire, black probe to the other.
- Read the display:
- Positive number: Red probe is on positive.
- Negative number: Red probe is on negative.
If you see “–18V,” swap the probes, and you’ll see “+18V. ” Now you know which is which.
Credit: www.solar-electric.com
What About Mc4 Connectors?
Most panels today use MC4 connectors. Here’s how to tell the difference:
- Male MC4: Usually negative (–)
- Female MC4: Usually positive (+)
But always check with a multimeter, as some brands switch the roles.
Comparing Solar Panel Polarity And Battery Polarity
Solar panels and batteries use the same polarity rules, but their roles are different.
| Device | Positive (+) | Negative (–) | Direction of Current |
|---|---|---|---|
| Solar Panel | Output | Return Path | From panel to load |
| Battery | Receives charge | Return Path | From charger to battery |
Always match positive to positive and negative to negative between devices.
How Polarity Affects Solar Performance
Incorrect polarity can lower system performance. Here’s what happens:
- Panels in Series: Wrong polarity can cancel out voltage.
- Panels in Parallel: Wrong polarity can cause current to flow the wrong way.
A system with reversed polarity may show zero output or trip protection circuits. Always double-check.
Polarity In Different Panel Types
Not all panels are the same. Here are some examples:
- Monocrystalline and Polycrystalline Panels: Standard red and black wires, clearly labeled.
- Flexible Panels: Sometimes use white and black wires—check the manual.
- Small “DIY” Panels: Polarity may be marked on the back with a diagram or sticker.
Tip: If your panel’s wires are both black, look for raised markings or use a multimeter.

Credit: www.youtube.com
Quick Reference: Polarity And Common Devices
Here’s a handy guide for wiring solar panels to popular devices:
| Device | Connect Panel (+) | Connect Panel (–) |
|---|---|---|
| Charge Controller | Controller “+” terminal | Controller “–” terminal |
| Battery | Battery “+” terminal | Battery “–” terminal |
| Inverter | Inverter “+” input | Inverter “–” input |
Always follow the device manual for wiring.
Safety Reminders
- Wear insulated gloves when working with live wires.
- Don’t touch both terminals at once.
- If unsure, ask a qualified electrician.
Two Insights Beginners Often Miss
- Polarity mistakes can void warranties. Many manufacturers will not cover damage from incorrect wiring.
- Solar panel output depends on sunlight, so always test polarity in full sun. Cloudy weather can give confusing readings or low voltages, making it harder to spot mistakes.
When To Call A Professional
If you’re working with panels over 100W or connecting to your home’s electrical system, it’s smart to consult a professional. High voltages can be dangerous.
Recommended Further Reading
For a deeper dive into solar technology and safety, check out this resource from the U.S. Department of Energy.
Frequently Asked Questions
What Happens If I Reverse Positive And Negative On A Solar Panel?
If you reverse the connections, your device may not work, and you could damage the charge controller or battery. Some systems have protection, but not all.
How Do I Identify Positive And Negative If Both Solar Wires Are Black?
Use a multimeter in sunlight. Touch one probe to each wire and see if you get a positive or negative voltage reading.
Are Mc4 Connectors Always The Same Polarity?
Usually, the male is negative and the female is positive, but it’s best to check with a meter or the panel label.
Can I Connect Solar Panels With Different Polarities Together?
Never mix positive and negative wires between panels. Always connect positive to positive and negative to negative, whether in series or parallel.
Do All Solar Panels Have Polarity Labels?
Most do, but some budget or small panels may not. Always double-check with a multimeter if you’re unsure.
Getting the positive and negative sides right on your solar panel is not a small detail—it’s the key to a safe and efficient system. Take a few extra minutes to check before connecting, and you’ll protect your investment and your safety.
With this knowledge, you’re ready to make your solar setup work at its best.