Have you ever stared at your roof and wondered, “How do I actually put solar panels up there?” Maybe you’re excited about saving money on electricity. Maybe you want to help the planet. Or, maybe you’re just tired of confusing advice online. You’re not alone. Many homeowners struggle with questions like: Will I damage my roof? What tools do I need? Do I need a professional, or can I do it myself? If you’re worried about making mistakes or simply want the clearest steps, this guide is for you.
We’ll walk through the process together—no jargon, no fluff. You’ll see the main steps, common errors, and smart tips from real installations. By the end, you’ll understand exactly how to attach solar panels to your roof, safely and confidently.
Short Answer
To attach solar panels to your roof, you first install mounting hardware (rails or brackets), secure it to roof rafters, place panels on the mounts, and connect wiring. You must follow local codes, use proper tools, and check for water leaks after installation.
Hiring a certified installer is safest, but DIY is possible if you’re handy and careful.
Now, let’s break down each step and clear up the details.
Planning And Preparation
Before you start, a good plan saves headaches. Many people skip this and regret it later.
Assess Your Roof
- Check roof type: Asphalt shingle, tile, metal, or flat roofs all need different mounts.
- Inspect for damage: Look for leaks, rot, or weak spots. Repair first, or panels could fall.
- Measure space: Panels need open, sunny areas. Avoid shade from trees or chimneys.
Choose The Right Panels And Mounts
Picking the wrong hardware is a common beginner mistake. Here’s a quick comparison:
| Roof Type | Best Mounting System | Notes |
|---|---|---|
| Asphalt Shingle | Rail-based mounts | Easy for DIY, common in US |
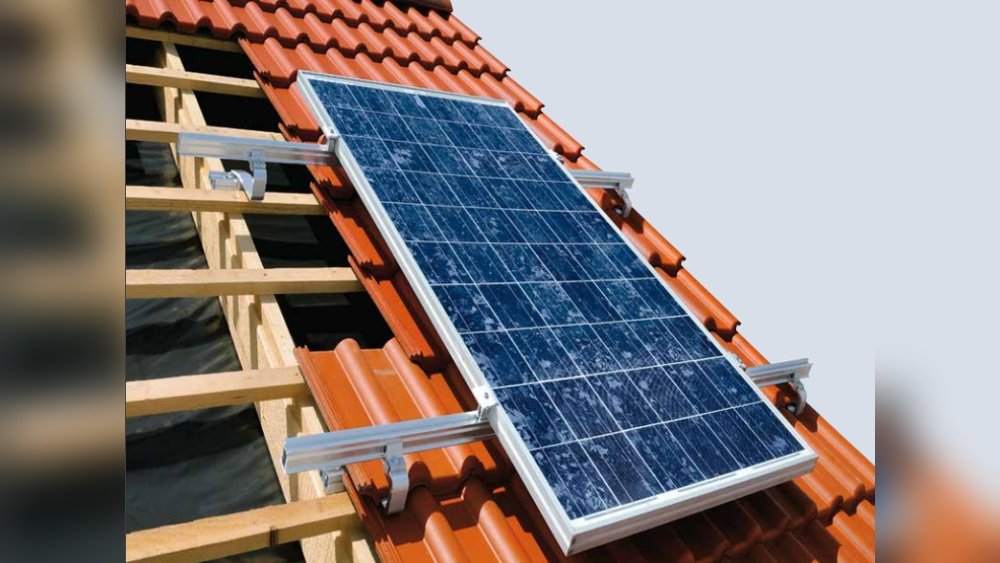
| Tile | Tile hooks | Need special brackets, careful not to crack tiles |
| Metal | Clamp mounts | No drilling, clamps to seams |
| Flat Roof | Ballasted racks | Panels sit on racks, no roof penetration |
Gather Tools And Materials
You’ll need:
- Drill and bit set
- Measuring tape
- Level
- Ladder
- Wrench or socket set
- Roof mounts and rails
- Sealant (for waterproofing)
- Solar panels
- Wiring and connectors
Don’t forget safety gear: gloves, harness, and helmet.
Check Local Rules
Many cities require permits for solar panel installation. Always check before you start. Some areas need inspection after you finish. This protects you from fines and problems later.
Step-by-step Installation
Let’s break down each step, making it easy to follow.
1. Mark And Locate Rafters
Rafters are the strong beams under your roof. Mounts must attach here, not just to roof material. Find rafters using a stud finder or tap gently—solid areas are rafters, hollow sounds are not.
- Mark each rafter where you’ll install mounts.
- Space marks according to your panel and rail size.
2. Install Roof Mounts
Mounts are brackets or hooks that hold rails. Most leaks happen here, so do this carefully.
- Drill pilot holes into the rafters at your marks.
- Place mount brackets over holes.
- Add sealant around holes for waterproofing.
- Secure brackets with lag bolts (tight, but don’t over-tighten).
For tile roofs, lift tiles and use tile hooks. For metal roofs, use clamps—no holes needed.
3. Attach Mounting Rails
Rails support the solar panels.
- Line up rails with the installed mounts.
- Use bolts to secure rails to brackets.
- Check with a level—rails must be straight, or panels won’t work well.
Rails should run horizontally or vertically, depending on your roof and local sun angle.
4. Place Solar Panels
Now, you’re ready for the panels.
- Lift panels onto rails (use help, panels are heavy and fragile).
- Attach panels to rails using clamps or bolts—follow manufacturer instructions.
- Leave small gaps between panels for airflow.
5. Connect Wiring
Panels must be wired together and linked to your home’s electrical system.
- Connect panel wires (usually MC4 connectors) in series or parallel.
- Run wires through a conduit to your inverter (in your garage or basement).
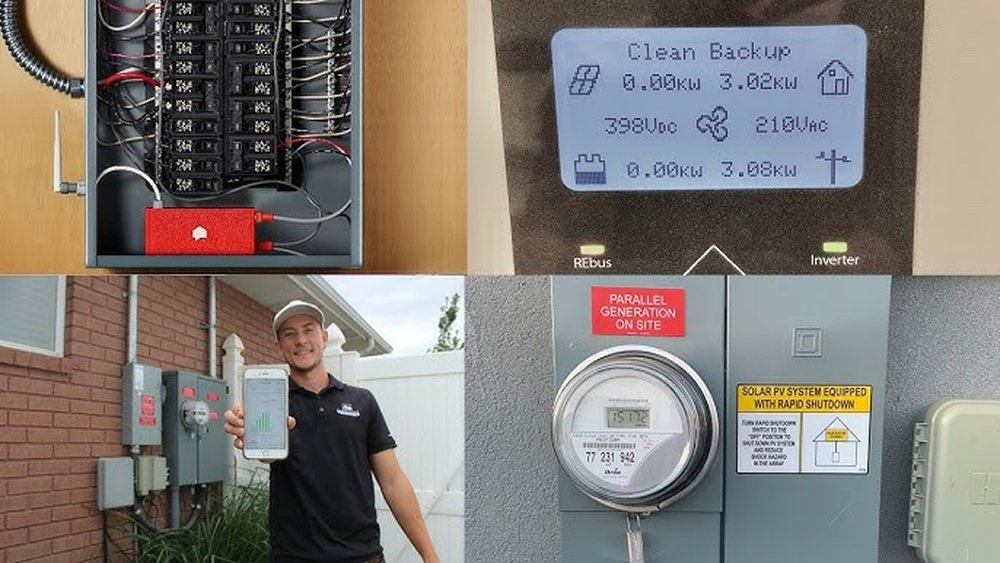
- Connect inverter to your main power box.
Only qualified people should connect to the main electrical panel. If you’re not sure, hire an electrician.
6. Test And Seal
Before finishing, double-check everything.
- Test panel output with a multimeter.
- Inspect for leaks—apply more sealant if needed.
- Clean up tools and debris.
Common Mistakes And How To Avoid Them
Mistakes can cost money, cause leaks, or even lead to injury. Here are two non-obvious errors many beginners make:
- Skipping Rafter Checks: If you miss rafters, mounts may pull loose over time. Always double-check.
- Wrong Sealant Type: Use roof-specific sealant. General sealant might not last through rain and sun.
Other common errors:
- Not tightening bolts enough (panels can shift)
- Over-tightening bolts (can crack mounts or rails)
- Forgetting to check panel angle for your location

Credit: www.solarcrowdsource.com
Example Installation: Asphalt Shingle Roof
Let’s see a mini example for a typical US roof.
- Jane wants to install three panels.
- She finds rafters with a stud finder and marks them.
- She drills pilot holes, adds brackets, and uses roof sealant.
- Rails go on next. She checks with a level.
- Jane and her friend lift panels onto rails, clamp them down.
- She connects wires, runs conduit to her inverter.
- Finally, she checks for leaks and tests the system.
Jane gets city approval and saves $80/month on her electricity bill.
Panel Placement: Getting The Angle Right
Panel angle affects how much power you get. Here’s a simple guide:
| Location | Best Panel Angle | Notes |
|---|---|---|
| Florida | ~25° | Low latitude, less tilt needed |
| California | ~30° | Moderate tilt for sun |
| New York | ~40° | Higher tilt for northern sun |
Adjust your rails or mounts so panels face south (in the US) for best results.
Comparing Diy Vs Professional Installation
Is it better to do it yourself or hire a pro? Let’s compare:
| Factor | DIY | Professional |
|---|---|---|
| Cost | Lower | Higher |
| Time | Longer | Faster |
| Safety | More risk | Safer |
| Warranty | Often none | Usually included |
| Skill Needed | High | Low (just choose a reputable company) |
If you’re not comfortable with heights, tools, or electricity, a professional installer is worth the extra money.
Smart Tips For A Long-lasting Installation
- Use high-quality mounts and rails. Cheap parts rust or break.
- Clean panels every few months. Dust and leaves block sunlight.
- Monitor your system. Many inverters have apps to track power.
- Schedule roof maintenance before installation. Panels last 25 years, so your roof should too.

Credit: www.solarpowerworldonline.com
Safety Reminders
Roof work is risky. Always:
- Use a sturdy ladder.
- Wear a harness if working high up.
- Never work alone—have someone nearby.
- Avoid windy or rainy days.
More than 100,000 ladder accidents happen in the US each year. Take your time and stay safe.
Legal And Financial Benefits
Installing solar panels can raise your home’s value. The National Renewable Energy Laboratory found homes sell for 17% more with solar. You may also get tax credits or rebates. Check Department of Energy for up-to-date info.

Credit: www.solarreviews.com
Frequently Asked Questions
How Long Does It Take To Install Solar Panels On A Roof?
For a small system (3–5 panels), DIY installation can take 1–2 days. Professionals can finish in half a day. Larger systems may need longer. Weather and roof type affect timing.
Will Installing Solar Panels Damage My Roof?
If you use proper mounts and sealant, there should be no damage. Most leaks come from poor installation. Always attach mounts to rafters and use roof-specific sealant.
Can I Install Solar Panels Myself?
Yes, if you’re handy and comfortable with roof work. You need basic tools and must follow safety steps. Electrical connections should be done by a licensed electrician.
What Is The Best Direction For Solar Panels?
In the US, south-facing panels get the most sunlight. East or west can also work, but output drops by about 20%.
Are There Tax Credits For Solar Panel Installation?
Yes, federal tax credits cover up to 30% of costs. Some states offer extra rebates. Check your local rules and Department of Energy for details.
Getting solar panels on your roof is a big step, but with good planning and safe practices, it’s easier than you think. Whether you do it yourself or hire a pro, you’ll enjoy lower bills and a greener home. Remember—take your time, double-check every step, and don’t be afraid to ask for help.